Toasted Walnut Banana Bread

banana bread

So, you know how it goes: grocery shopping on a Sunday, all the best intentions in the world… meal planning… fresh fruits and vegetables….dreams of juicing. Then a week and a half goes by and you’ve had takeout three times and, well, some sorely neglected produce is languishing in your fridge and on your counter.  There isn’t much you can do about wilted lettuce and bendy carrots but bananas… bananas have been waiting for this moment all week. In fact,  sometimes I buy bananas knowing full well that what I really want in my heart is BAKED GOODS. Thus is the journey of this lovely fruit from the best of raw fruit intentions to the inevitable destination of cozy, indulgent afternoon cakes.

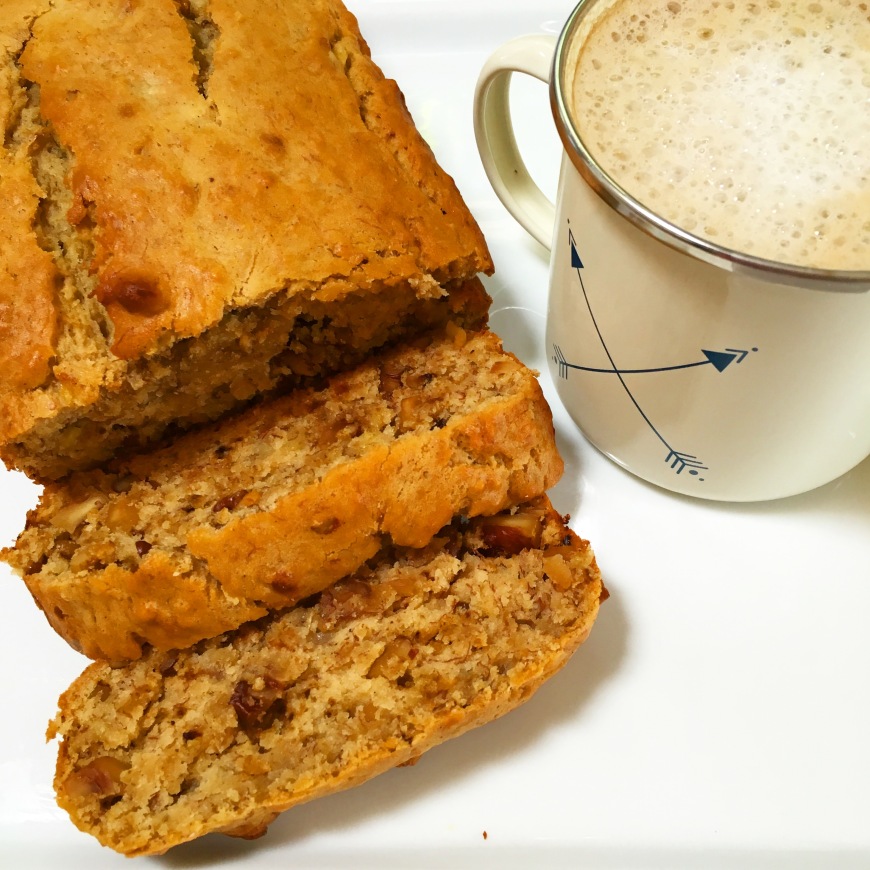
This banana bread is very moist, I suggest serving each slice individually toasted with a dab of butter and an accompanying maple latte as shown. Remember, the next time you are in the produce aisle, there ain’t nothing wrong with smoothie dreams and banana bread mornings!

Toasted Walnut Banana Bread

Makes 1 loaf

1/4 cup unsweetened non-dairy milk (I used cashew)

1/2 tsp vinegar

1/2 cup vegan butter (I used a brand called ‘Melt’, it’s coconut oil based)

1 cup brown sugar

3 very ripe bananas, mashed

2 tsp vanilla bean paste (or vanilla extract, I just like the paste for the real flecks of vanilla)

2 cups flour

1 tsp baking soda

1/2 tsp baking powder

1/4 tsp nutmeg

1/4 tsp salt

3/4 cup raw walnuts, chopped

Preheat the oven to 350 degrees. Once heated, spread walnuts out on a baking sheet and toast in the oven for 5 minutes. Set aside.

In a small bowl, combine the milk and vinegar, stir and set aside.

In a medium bowl, cream together the butter and sugar.

Combine the mashed banana, sugar mixture, and milk mixture.

In a medium bowl, combine all the dry ingredients except walnuts and stir to combine. Don’t over-stir, just make sure the dry ingredients get wet.

Add the dry to the wet and stir to combine, then fold in the walnuts.

Line a 9″ loaf pan with either parchment paper or spray with an oil coating and a dusting of flour.

Pour batter into pan and bake for about 35-45 minutes. Test to see if a toothpick comes out mostly clean.

Let cool 5 minutes in the pan before turning it out. If using parchment as I did, you can lift it out, with that pretty and crusty top.

Don’t forget to toast each slice with some butter and enjoy with a cup off coffee or tea. I mixed 2 shots of espresso-sweetened with maple syrup- with half a cup of steamed cashew milk….heaven.


Mini Chimichangas with Ataulfo Mango Salsa

chimichangas

Hola! it’s Cinco de Mayo! I’m sorry this picture is terrible haha, it just is. But these Chimis were so good!!! (Do I say that too much? I think I might be saying that too much about my own food.) I started out trying to make chorizo chimichangas, and then I realized, soyrizo is pretty gross, and organic corn and black beans are ten times better. That’s not to say I didn’t think this recipe through! The ‘queso’ is the best part, and I’ve been working on it for a while. I live with several dudes, who are very proudly carnivorous. So, sometimes I cook just for the heck of it, not thinking anyone will eat what I make, because ‘Bacon!’ And sometimes, like with these, my roommates DEVOUR every little morsel, knowing full well that they are vegan, and admittedly, loving every bite.  That’s when I know I have a good recipe. The sweetness of the corn really made these sing. And, there is something sweet, mild, and comforting in the cashew sauce.


Mini Chimichangas with Ataulfo Mango Salsa

serves 4

1 tsp peanut oil

1/2 onion, diced

1 jalapeno

2 tbs bell pepper, minced

3 cloves garlic

mounded 1/2 tsp salt

1 cup soaked cashews

1 tbs nutritional yeast (optional)

1/4 cup water

8 flour tortillas (about 6″ diameter)

1 can black beans

1 cup organic corn

enough peanut oil to fill a small pan 1/4″ high


Salsa:

2 Ataulfo mangos, diced

1/4 onion, diced

3 cloves garlic, minced

1 jalapeno, minced

2 tbs bell pepper, minced

1/2 tsp salt

1 tsp sugar

1/2 tsp coriander

1 sprig cilantro, chopped


First, heat the 1 tsp peanut oil in a small pan. Fry the onions, jalapeno, and bell pepper for about 10 minutes over medium heat.

In a food processor, combine the onions mixture, the garlic, salt, cashews, and water and blend until very smooth. About 5 minutes. Set aside.

Heat oil in a small pan over medium. Fill your little tortillas with 1 tbs black beans, 1 tbs corn, and 1 tbs onion ‘queso’ mix.

Wrap tortilla into a little burrito, then gently lay in the hot oil, folded side down first.

After about 20-30 seconds, flip, and fry another 20 sec. You want them to be golden brown. Have a paper towel lined plate ready for them.

For the salsa, combine all ingredients. Th salsa will last 1-3 days in the fridge.

Serve everything immediately. Although you can make these chimis the day before and heat them up in a low temp oven.

Are you having a Cinco de Mayo fiesta? Here are some other Mexican favorites to round out your buffet:

Black Bean and Butternut Squash Cantina Tacos

Perfect Guacamole

Cilantro Jalapeno Chipotle Hummus


chimi

Buffalo Cauliflower Wings with Homemade Ranch Dressing

buffalo wings

This wouldn’t be a complete plant-based food blog without the ever-popular-on-pinterest Buffalo Cauliflower Wings. Not only are these super easy to make, but they taste way more authentic than you are probably expecting. I’ve actually had these at a restaurant recently that served them with legit vegan bleu cheese! I don’t know how they did that, I don’t think I’m quite up to playing around with mold, so I went with vegan ranch dressing instead- which is a great staple to have on hand anyway! It’s really nice that these are baked instead of fried, so you are not loading up on unnecessary oil. You could, however, fry them if you want to instead of baking, your call! Serve these up with some celery and carrot sticks the next time you’re in the mood for some not-so-naughty bar food. They really hit the spot. 🙂

Buffalo Cauliflower Wings

Makes 2 servings

1 cup flour*

1 cup beer

1 tsp garlic powder

1 tsp onion powder

Salt and pepper

1 small head of cauliflower, cut into small bite sized pieces

3/4 cup Frank’s Red Hot Sauce

1 tbs Earth Balance (optional)

*You can easily use gluten-free flour and water instead of beer to make this a gluten-free treat, the taste is barely changed at all

Ranch Dressing

1 cup soaked cashews (at least 3 hours)

1/3 cup water

Juice of 1 lemon

1 tsp fresh chopped dill

1 tsp fresh chopped parsley

1 tsp garlic powder

1tsp onion powder

Salt and pepper to taste

Preheat oven to 450 degrees. Make sure to measure the beer after the foam has subsided. Combine flour, beer, garlic powder, onion powder, salt, and pepper in a medium bowl, stir to combine. It should be the consistency of pancake batter, you might have to add a bit more beer depending. Lightly grease a baking pan, or you can use parchment paper. 

One by one, dip the cauliflower bites into the batter to coat, and then use a fork or slotted spoon to lay them on the sheet. 

Try to work quickly so the batter doesn’t have too much time to pool under the florets.

Pop them in the oven for 20 minutes.

Meanwhile, melt the butter if you are going to use it and mix it with the Frank’s sauce.

Also Meanwhile, combine all the ranch ingredients in a food processor and blend until super smooth, a few minutes. Taste and adjust spices as needed.

Pull the ‘wings’ out and drizzle the sauce all over them. Give them a gentle toss on the pan to really get them fully coated.

Pop them back in for about 5 more minutes so that the sauce gets heated up as well.

Serve the ‘wings’ immediately it ranch on the side. 

*Update: I think it would be nice to wash the cauliflower florets, then sprinkle some salt, pepper, and garlic powder directly onto the florets before battering them, just as you might season your chicken wings. Enjoy!
buffalo cauliflower

B.L.A.T. Salad

B.L.A.T. Salad

Behold, a truly awesome, delicious salad! I have taken the last month off from blogging, both for the holidays and to just relax my mind a bit, but I knew when I made this that it would be the perfect recipe to kick off the new year! The flavor dynamics of a B.L.T. are pretty flawless. I think we can all agree on that. But if you are trying to live a healthier life and tackle some resolutions, whether it be low cholesterol, paleo, vegan, high raw, or low calorie, that traditional sandwich is not going to do you any favors. But it tastes so good! That’s where this salad comes in. All the amazing flavor, none of the meat sweats. Plus I’m sure you will find plenty of other uses for the delicious portobello bacon.

I always like to make about 10 resolutions every year, that way if even 3 of them stick, I’ll have made a lot more progress than if I had just made 1 resolution. 2014 was hands down the best and busiest year of my whole life, so I think my resolution strategy worked pretty well. Last year I traveled a lot (Nicaragua, Utah, Nevada, Arizona, North Carolina, New York) I volunteered at the farm sanctuary and fostered and re-homed a bunch of stray kittens. I explored my city like never before, and worked out more that 2012 and 2013 combined!

This year I have intentions to build on last year: I want to work out even more, (more yoga and hiking!) I hope to learn a couple musical instruments. I want to travel and see more live music. I want to donate all my unnecessary stuff and feel more organized. I want to be kinder and more patient with loved ones and strangers. I want to save money and grow some plants. I want to tackle what I call: Laundry Mountain (a project that I hope to accomplish by 2017 haha) And as always, I want to make and share as much vibrant, cruelty-free, delicious food as possible! Those are just a few of the top items on my list. So far, so good! What are your intentions for the year? I hope you had some great holiday family time, and are starting 2015 with a bang!

B.L.A.T. Salad

makes 2 servings

2 portobello mushroom caps

2 tablespoon virgin coconut oil or first cold pressed olive oil or

1.5 tbs coconut sugar (or brown sugar, or 2 tbs maple syrup)

1 tsp black pepper

1 tbs mesquite salt (or bacon salt, yes it’s vegan!)

a tiny pinch of garlic powder

1/2 tsp paprika (for color)

1 head of romaine

2 roma tomatoes

1 avocado

2 tbs thinly sliced red onion

1/2 cup pesto

more black pepper

Scrape out most of the gills from the mushrooms, it’s ok to leave a bit of the darker stuff behind, it even makes it look more bacon-like when it’s cooked, just scrape away 3/4 of gills. Remove stems and cut into very thin (1/4″-1/8″) slices, like bacon.

Spread the sliced mushrooms out in a big shallow bowl and drizzle evenly with the oil, then sprinkle on the sugar and spices. Use your hands to gently rub the marinade in there. You will see the paprika turn the mushrooms into a deep rich red. If you taste it, it should be overwhelmingly salty and smoky and sweet (the flavors dull a bit when cooking so you really want to coat these slices in a greasy spice crust.)

For raw ‘bacon’: set your dehydrator to 115 degrees and lay them on a dehydrator rack, dehydrate about 8 hours.

For baked ‘bacon’ (bakon?): preheat your oven for 350 degrees and lay the mushrooms on a lightly greased pan. Bake for about 15 minutes, turning once. It’s ok if the get a tiny bit burnt around the edges, it really contributes to the authentic flavor. Allow to cool about 10 minutes, as this helps it set and get a bit crunchier.

Meanwhile, finely shred your romaine lettuce.

Dice the tomatoes and avocados and combine with the lettuce and sliced onions. Then drizzle with some pesto.

Chop the bacon and sprinkle it on top. Sprinkle some more pepper on top and serve immediately. Tossing is recommended, but it looks prettier right before you toss it. 🙂

Option: for a different dressing idea: combine 4 tbs of maple syrup, 4 tbs mustard, 2 tbs of vegan mayo (like Just Mayo or Veganaise) and 1 tbs apple cider vinegar. Or dare I say, use BOTH of these dressings together. Throw on some croutons for a truly authentic and deconstructed B.L.A.T.

Dig in!

blt


Christmas Chili

IMG_1998On the fifth day of Christmas my true love gave to me: 5 different spices, 4 kinds of beans, 3 secret ingredients, 2 kinds of peppers, and a bowl of spicy white bean chili! (Ok that was a stretch.) Whether you are going to a potluck or just want something easy to heat up during the busy holiday season, this chili hits the spot. It doesn’t even take very long to throw together, and next time I’ll have to try it in the crock pot, for even less work. My secret ingredients (and this goes for a lot of soups, stews, and sauces) are vinegar, sugar and beer (or wine). You can’t taste that they are there, but they make the other flavors really pop. I called this Christmas Chili because of the large amount of red and green peppers, but also because this tasty stuff can help you avoid the dreaded holiday bulge. Each serving is about 215 calories and boasts 9 grams of fiber and 12 grams of protein! Yummy, healthy, easy, inexpensive, and festive, woohoo!

Christmas Chili

makes about 10 servings

1 white onion

1 green jalapeno

1 red jalapeno

1 1/2 green bell pepper

1 1/2 red bell pepper

10 cloves garlic

1/2 cup loosely packed cilantro plus more for garnish

2 tbs olive oil

2 tsp chili powder

2 tsp salt

2 tsp cumin

1 tsp white pepper

2 tsp coriander

1 tsp cayenne (more or less, depending on how spicy you like it)

1/2 cup of beer ( I used a ‘holiday spiced ale’ but any beer on the lighter side will work well)

2 cups vegetable broth

1 tbs apple cider vinegar

3 pinches of sugar ( I used coconut sugar, because it almost has a salty/savory taste, but brown will work also)

1 16 oz. can navy beans, rinsed and drained

1 16 oz. can garbanzo beans, rinsed and drained

1 16 oz. can black eye peas, rinsed and drained

1 16 oz. can white kidney beans, rinsed and drained

1 cup of fresh or frozen organic corn

Chop the onion, peppers, garlic, and cilantro.

Heat the oil in a large pot over medium high heat. Add the onions and cook about 5 minutes. Then add the peppers and garlic, and continue to cook for about 15 minutes, stirring often. Add the spices and stir to combine.

As soon as the majority of the liquid has evaporated and you are having to scrape along the bottom of the pot o keep things from sticking, pour in half the beer. Stir and let it evaporate, then pour in the rest.

Cook an additional minute then add the rest of the ingredients. Bring to a low boil and reduce the heat to low.

Stick an immersion blender in the pot and give it two or three pulses. (Another option is to remove 2/3 cup of the chili, and pulse it in a blender a few times, then return it to the pot. This step gives it a thicker, creamier, stew like texture.)

Let it simmer for about 5-10 more minutes. Taste and adjust seasoning as needed.

I love to serve it with fresh cilantro, sliced avocado, crushed tortilla chips, sriracha, and a big blob or tahini (instead of sour cream. I don’t know if that’s weird, but I think it’s delicious!) You can even use this as a yummy and warm bean dip. If you are into black bean chili instead of white, check out my other Hearty Black Bean Chili recipe.

Happy Holidays!IMG_2011

IMG_2014

Scrumptious Lentil Loaf

lentilloaf3Mmmm…. Loaf. Ok, so the word ‘loaf’ is not the most delicious sounding thing in the world, BUT if you are craving traditional meatloaf, this plant-based version will definitely hit the spot! The flavor and the glaze particularly are a home run in the nostalgia department. A quick note on the EnerG egg replacements: this stuff is a really great staple to have around. It’s a very inexpensive blend of basically baking soda and tapioca flour. It’s just a baking mix that you add a little water too, and voila, stuff holds together. Follow the directions on the box for how to make an ‘egg’. You could also use a flax or chia ‘egg’ if you like. Two slices of this Lentil Loaf will provide you with about 200 calories, 10 grams of protein, and 20% of your daily recommendation for iron, plus a healthy dose of Lycopene!  Serve this with some mashed potatoes and roasted carrots for a dinner straight out of 1950’s American suburbia. Grandma would approve.

Scrumptious Lentil Loaf

Makes about 12 slices

2.25 cups water

1/2 vegetable bullion cube

2 +1 tbs olive oil

1 red onion, finely chopped

10 cloves garlic, minced

1/2 red bell, minced

2 cup mushrooms, finely chopped

1/2 large carrot, grated

3 packed tbs chopped fresh parsley

1 cup dry red split lentils

3 tbs tomato paste

A big pinch thyme, paprika, red pepper flakes, garlic powder, salt, pepper

A smaller pinch of cumin

1/2 cup gluten-free rolled oats

2 EnerG egg replacers

Glaze:

1 tbs tomato paste

2 tbs brown sugar

2 tsp mustard

3/4 cup ketchup

In a medium pot, boil the 2.25 cups of water and the 1/2 bullion cube over hight heat. Use a spoon to breakdown and dissolve the cube. (Or you can just use 2.25 cups of vegetable stock, I just found that the vegetable bullion had a meatloaf-ier flavor)

Preheat oven to 400.

Once the water is boiling, add the dry lentils, reduce heat to low, and cover. Do not over-cook the lentils, they will turn to liquid mush! The directions on my package said 12 minutes, but check them at about 9 minutes. You don’t want them to have any crunch left, but you don’t want mush. Remove from heat and set aside.

Heat 2 tbs of the olive oil over medium heat in a large pan.

Add 1/2 of the chopped red onion, the garlic, the bell pepper,  1 cup of the chopped mushrooms, and the grated carrot to the pan.

Saute for about 5 minutes. Add the parsley and spices and heat another minute or until all the vegetables are soft. Remove from heat.

In a large bowl, or right in the pan if it’s big enough, combine the sautéed veggie mixture with the tomato paste, oats, egg replacers, remaining 1/2 of the chopped onion, remaining 1 cup of chopped mushrooms, and lentils. Stir everything until evenly combined. Give it a taste to see if it needs any seasoning adjustment.

Take a medium baking sheet and grease it with remaining tbs of olive oil. (You can also use a loaf pan.) Scoop all of the loaf mixture and mold it into a loaf shape on the pan. You can make it kind of tall, because it will settle down as it bakes.

In a small bowl, combine the 1 tbs tomato paste, brown sugar, mustard, and ketchup, and stir well. Pour this over the top of the loaf, coating the loaf evenly, and especially piling it high on top, so it can drip all around.

Pop your loaf in the oven for about 35-40 minutes. When you take it out, let it rest for about 8 minutes before slicing.

This was particularly good the next day, as it was easier to slice after being refrigerated overnight. Put a slice on a crusty roll and toast it in the toaster oven for a seriously yummy meatloaf sandwich.lentilloaf1

The Double-Double-Take: Super Deluxe Veggie Burger

burger2
Sometimes, you just want a big juicy burger. You want to get outside, fire up the grill, and sink your teeth into a big saucy mess. In America, we do this as an act of patriotism. But when I think about veggie burgers, I picture processed soy protein isolate and long ingredient lists full of chemicals. Or if they are homemade, I picture mushy, over glorified potato pancakes spotted with bewildering chunks of carrots and peas. While both of those  sound better to me than a bloody, artery clogging beef patty, neither are very compelling.  So I set out to make a veggie burger made with whole foods, one that looks, tastes, flips, and sizzles like the burgers in our American dream.
I got 5 men who you couldn’t pay to eat a plant based diet to be my test subjects for this recipe. Because I didn’t just want to make an amazing veggie burger, I wanted to make an amazing burger period; and I needed a tough crowd to be the judge.
My inspiration for flavor was the In’n’Out Double Double, a Southern California standby. This burger, in my opinion, exceeds all others because it is packed with fresh ingredients and uses 1000 island dressing as a secret weapon sauce. 
After perousing dozens of popular recipes, I saw some great ideas, but I found that they were generally missing 1 or 2 of the 4 factors that would make a burger great: 
  1. Flavor. Of course! You want it to taste savory, charred, and meaty.
  2. Texture. it can’t squeeze out of buns like a tube of toothpaste when you bite into it. It can’t be a crumbly mess like beef taco filling. It can’t have giant chunks of various vegetables all over, it should be a pretty uniform texture. 
  3. Appearance. Does it look like a latke? It shouldn’t. Is it weirdly grey? We don’t want that. We want that brown sear on the outside, with a pink and juicy inside, and grill marks.
  4. Quality. The ingredients should mostly be whole, healthy, nutritious ingredients. Not overly processed or chemical laden.
3 out of 4 just won’t do, especially when you are serving these to discerning eaters. 
xx
The Double-Double-Take: Super Deluxe Veggie Burger
Makes 6-8 patties
1/4 of a whole beet
5 tbs olive oil, divided (plus additional to grease the grill/pan)
2 portobello mushrooms
1/2 of a whole red onion
6 cloves garlic
1/2 cup gluten free uncooked rolled oats
5 ounces of cooked brown rice
15 ounces cooked black beans
1 tbs ketchup
1tbs dijon mustard
1/2 tbs paprika
1 tsp salt
1/2 tsp black pepper
1 tsp liquid smoke
Preheat oven to 375 degrees. Cut the beet into quarters and set aside 3 of those quarters for another use. Put the single quarter on a piece of aluminum foil and drizzle with 1 tbs olive oil. Wrap it up tight and pop it in the oven for about 25 minutes or until fork tender.
Meanwhile, mince the portobellos, onion, and garlic. In a large frying pan over medium flame, heat 2 tbs olive oil and added the minced mushrooms. Cook, stirring occasionally for about 3 minutes, add onions. Cook for another few minutes until onions are soft and translucent, add garlic, cook about 1 more minute. Set aside to cool.
Put the half cup of oats in a blender and blend for about 30 seconds to break down the large pieces. Once the beet is done and cooled, chop it into a few smaller pieces and add it to the blender as well, along with the black beans and brown rice.  Give them about 10 long pulses, scraping down the sides as necessary. You don’t want to form a homogenous paste, but you do want the rice grains and beans to break down a bit. 
In a very large bowl, combine all the ingredients and use your hands or a giant fork to mix everything together. 
Form patties and refrigerate for about 30 min before cooking. You can also make these the day before you plan to cook.
Preheat your grill till it is piping hot and oil up the grate. 
Throw the patties on there and flip them after about 5 minutes. This time can vary depending on your grill so use your best judgement. The main thing you want to see is glorious grill marks.
You can also fry these in a pan over medium high heat, when I did that they only took about 3 minutes per side. 
Toast your buns and pile on the fixins’!
Pictured here is lettuce, tomato, onion, ketchup, mustard, and 1000 island dressing. 
About that dressing….
xx
1000 Island Burger Sauce
makes about 1.5 cups
1 cup Veganaise
1/4 cup ketchup
3 sweet baby pickles, minced
2 tbs of the pickling liquid
Mix all ingredients together in a small bowl and slather onto your buns.
xx
Suggestions for variations:
barbecue sauce and grilled onions
avocado slices and coconut bacon
Grilled veggies and tahini
xx
But I don’t need to tell you how to eat a burger.

Perfect Guacamole

guacamole

Guacamole is hard to mess up, but it’s also easy to make boring guacamole, which I just cannot tolerate, and neither should you. Of course the following rules are all based on my opinion but you can go ahead and consider it gospel. The key to good guacamole is fresh ripe avocados, lots of heat, and lots of texture. Do not blend it, do not add sour cream, do not forget the lime, these are the basic guidelines. Store bought avocado puree that comes in those little pouches will give you a sour, fermented tasting guacamole, like the kind you get at bad restaurants. Adding sour cream is essentially like watering it down in terms of flavor, you are adding fat to fat and it gets sort of sickening. Pureeing or over mashing your guacamole will give it a baby food texture, not good. So, now that you know what not to do, you are ready to make a huge bowl of salty, creamy, spicy, chunky, flavor-packed, deliciousness!! I like to use bell peppers instead of chips, but guacamole is good on so many things– sandwiches, salads, tacos, toast, or just straight up with a spoon. Guacamole is also a powerhouse of healthy nutrients, isn’t it nice when delicious food is good for you? This whole recipe has 11 grams of protein, 19 grams of fiber, 55% of your daily required vitamin A, 15% of your iron, 10% of your calcium, and a whopping 334% of your vitamin C! If you’re like me, you could easily sit down and eat this whole bowl for lunch… which I did. So go forth and mash some avocados, summer is coming!

Perfect Guacamole

Makes approx. 3 cups

3 large ripe avocados

6 cloves garlic

1 shallot

9 cherry tomatos

1 jalapeño

1/4 cup cilantro leaves

1/2 tsp salt

Juice of 2 limes

1/2 bell pepper cut into triangles for dipping (optional)

Cut the avocados in half, pop out the seed, scoop out the meat with a spoon, save the pit.

I have a technique for taking out the pit: after slicing in half, you hold the avocado (the half with the pit stuck in it) in one palm, then whack the blade of a knife into the pit with your other hand, sort of like when you throw an ax at a tree and it sticks, but don’t let go of your knife! You can then twist the knife and the pit pops right out. Then carefully use the tip of the knife to slice the avocado about 3 times in both directions, making sure to get right to the peel, but not slicing through to your palm underneath. From there you can scoop out perfect large chunks with a spoon, scraping along the peel to get maximum avocado meat. Your peel should be perfectly scraped to the black when you throw it out. Waste not want not. Please don’t cut yourselves.

Add the avocado to a deep mixing bowl. Mince the garlic, shallot, tomatoes, and jalapeño and add to the bowl. You might only need one lime, depending on how big and juicy it is, it’s your call. I have had limes that release 1/4 cup of juice, and some that only release a tablespoon. Aim for 1/4 cup total.  Combine everything in the bowl and mash with the back of a fork. Try not to over mash! Guacamole should be eaten immediately, but if you need to store it in the fridge, put the pits you saved back in, which keeps it fresh longer. Cover with plastic wrap and make sure the plastic actually comes in to contact with the surface of the guacamole wherever possible, you want to prevent it from oxidizing, which turns it brown and sour. One last note, I added a tsp of hot sauce to mine as well, because I have a really lovely raw hot sauce and I wanted it to be extra spicy. You can use Sriracha here, but it’s not necessary. Can you tell avocados are very serious business for me?

Butternut Squash and Black Bean Cantina Style Tacos With Chipotle Crema

butternut squash and black bean cantina tacosI have been wanting to make these for a long time, because it dawned on me that this combination of ingredients would make great tacos, without trying to fake any meat or cheese. I love the combination of sweet, savory, spicy, smoky, and citrusy that you get with these, they are bursting with flavor! As with a lot of my recipes these days, they are a great thing to make on your day off and eat for the rest of the week, as the components all hold up quite well and make great leftovers. I really love the tiny organic corn cantina tortillas if you can find them, it’s usually the only size used by the Mexican food trucks here in Los Angeles, so it feels more authentic. I had been looking forward to the opening of this restaurant called Gracias Madre here in town for weeks, and in the meantime, I decided to try my hand at some fresh and flavorful plant based tacos. I actually made these the night before we went to try out Gracias Madre for my birthday, so I could get ideas and see if I wanted to change anything based on the experience. The food at the restaurant was fantastic! Nonetheless I think these tacos turned out great without any tweaks, if I do say so myself, Ole!

Butternut Squash and Black Bean Cantina Style Tacos With Chipotle Crema

1 serving of 4 mini tacos, easy to scale to your needs

1/2 cup butternut squash, cut into 1/4″ cubes

1.5 tbs organic raw sugar

1 tsp cumin

Sprinkle of nutmeg

Sprinkle of salt

2 tbs olive oil, divided

1 cup of cashews, soaked overnight in water on the counter or boiled in water for 20 min.

Juice of 1 lime plus 1 lime cut into wedges

1 tbs dried chipotle powder (or 2 whole chipotle peppers!)

1/2 tbs agave nectar

1/2 tsp sea salt (might need more after you taste it

1/2 cup water

4 mini organic corn tortillas, (4″ diameter)

1/2 cup cooked black beans

1 shallot

2 tbs olive oil

1 sprig cilantro, roughly chopped

1/2 large avocado, cut into thin slices

Hot sauce as desired

Preheat oven to 400. Cube the butternut squash and put into a small bowl with the sugar, cumin, nutmeg, and salt, drizzle with 1 tbs olive oil, and toss to coat. Drizzle the 2nd tbs of olive oil onto the pan and spread it around, then throw the squash on there. Spread the squash out evenly, the farther apart the pieces are from each other, the better-  they will roast instead of steam this way. Cook this for 10-15 minutes, tossing about half way through. Keep an eye that they don’t burn with this tiny dice!

In the meantime, add the cashews, chipotle, lime juice, agave, and salt to a food processor and blend, slowly adding in the water a little splash at a time and allowing it to integrate. Keep adding the water until you get a saucy consistency; you want it to be thick, but you should be able to drizzle it off a spoon. Taste and adjust seasoning as desired.

Slice the shallot very thinly, as thin as you can. Heat up the 2 tbs olive oil in a small pan and throw the shallots in there over medium heat and give the pan a few shakes. Allow them to just sit there for about 30 sec., then  scrape a stir them gently until they are caramelized and golden.

I think tortillas are best if you microwave them in a stack for about 15 sec, they get warm and soft.

Lay out each tortilla and add two tbs of the butternut squash and two tbs of black beans to each. Next lay a slice of avocado on each taco. Sprinkle on a few slices of the crispy shallots and a sprinkle of cilantro. Drizzle on a tablespoon of the Chipotle Crema and a splash of hot sauce if you like.

Serve with the lime wedges on the side and enjoy a tall cerveza while you are at it.

butternut squash and black bean tacos

Harvest Bliss Bowl

IMG_1225

A good salad is a work of art. While I love a big green salad with every color of the raw rainbow, there is no reason why a salad can’t also be a rich and decadent comfort food, making you feel full and cozy on a cold day. The Harvest Bliss Bowl is just such a salad. With an array of textures and flavors, this sweet and savory bowl is like being wrapped in a warm blanket of yum.

Plus, I have a bonus tip for you about the beloved vitamin D. Vitamin D helps your body absorb calcium, which we all know leads to stronger bones. It also helps prevent cancer, improves your immune system, and prevents aging. If you are eating a well rounded whole foods plant based diet, you are already on your way to having much stronger bones that your dairy drinking friends. Crazy you say? Actually the newest research on dairy has shown that it creates an acidic environment in the body. Your body does not want to be acidic, so it draws calcium OUT of your bones to neutralize the acidity. This is why osteoporosis is so much higher in regions around the world that depend heavily on dairy, like the UK and North America; whereas in places where they do not consume dairy, osteoporosis is almost non-existent. Think about who is telling you that milk ‘does a body good’, the company selling you milk? The government approved food pyramid created by representatives with ties to the dairy industry? Sorry to burst your yogurt bubble guys, but dairy is making swiss cheese out of your femurs.

Feel free to google it on your own. Here’s a  start.

Now back to that bonus tip I started to tell you about! We know that your body can create it’s own vitamin D just by getting a little sunshine, but guess what else does that? Mushrooms! If you leave 100 grams of fresh mushrooms out in a sunny spot, gills up, for 8 hours, they will increase there vitamin D content from 40 IU to 46ooo IU!!! Do you know what the average daily recommendation is? Only 800 IU a day! All the vitamin D you could ever ask for, just waiting to be activated in that cute little mushroom cap. This also means that leaving them out in the sun for even 10 minutes will give them a boost. And on top of that, mushrooms create an alkaline environment in your body, so not only do they not throw your PH off balance, they actually make it better!

I like to make all the parts of this salad ahead of time, then assembly is only a two minute process. This is great even if everything is served cold!

Harvest Bliss Bowl

Makes about 4 servings

for the quinoa:

2 cups vegetable broth

1 cup rinsed quinoa

Combine the quinoa and broth in a medium pot over high heat. Bring to a boil, cover, reduce heat to low, cook for approx. 15 minutes. Fluff and set aside or refrigerate.

for the roasted veggies:

2 portobello mushroom caps (vitamin D turbo-charged preferred) cut into 1/2 inch cubes

8 ounces butternut squash, cut into 1/2 inch cubes

8 cloves garlic, cut in half

1/2 sweet vidalia onion, roughly quartered

3 tbs olive oil

1/2 tsp each of crushed dried rosemary, dried thyme, black pepper, dried oregano (or just a couple tsp of italian seasoning)

salt to taste

For the garlic croutons:

3 slices crusty bread, chopped into small cubes

1 tbs olive oil

a heavy sprinkle of garlic powder

for the roasted pecans:

1/2 cup raw pecans

2 tbs maple syrup,

salt to taste

1 tsp black pepper

Everything else:

3 cups of rocket arugula

2 tbs first cold pressed olive oil

a little squeeze of lemon juice or apple cider vinegar

1 tbs balsamic vinegar reduction per portion, for drizzling (directions for reducing balsamic here.)

Assuming that you have already made your quinoa and it is waiting for you in the fridge, preheat the oven to 400. Toss all the roasting vegetables in a big bowl with the herbs, salt, and olive oil until evenly coated. Lay them out on a foil lined pan. The more you space them apart, the more they will caramelize, the more you cram them together, the more they will steam. I was in a hurry so I crammed, and they still came out great. Put the veggies in the oven and roast for 30-40 minutes, giving them a good stir every 10 minutes.

Reduce the oven temp to 375. In a small bowl toss all of the crouton ingredients until they are well coated. In a separate bowl, toss all your pecan ingredients until well coated. These can go in the oven together on separate sides of a big foil lined roasting pan to save you time. Check on them about every 3 minutes and give them a toss. Both of these items toast up fast and burn easily, so I just commit to standing there watching and tossing until they are perfect, about 8 minutes.

Finally, in another bowl, toss the arugula and oil and lemon juice until well coated.

To assemble, scoop a big pile of quinoa into the bottom of your salad bowl. Top with the arugula, and then scatter the roasted vegetables, pecans, and croutons on top. Drizzle with balsamic reduction or eat as is. Cozy and delicious!

IMG_1243